
Getting video to synch with your audio can be difficult sometimes. This month we will explore how to synchronize video clips to the audio track using markers in Premiere 5.1. We will also discuss how to develop a sense of what scale to work with in order to accomplish specific tasks.
Begin by opening up the marilyn.ppl or open a new project with the following settings:
Editing Mode QuicktimeFrame Size 320 X 240 Frame Rate 29.97 Audio Rate 22050 Audio Format 16 – Mono Audio Compressor QDesign Music Compressor Sorenson Video
Now drag the audio onto the Timeline. The first thing to do is to know your audio inside and out. Know the beat. Play your audio clip over and over. Close your eyes and feel the beat, Once you know the beat, lyrics and or the chorus it is time to apply markers to your audio.
There are two types of markers; numbered and unnumbered. You can apply as many as 10 numbered markers to the Timeline and each clip. You can apply up to 999 unnumbered markers to the Timeline and each clip. For this tutorial we will use unnumbered markers.
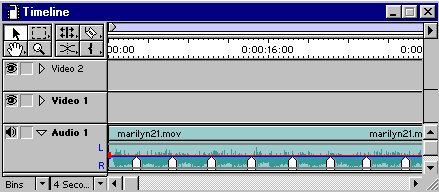
Double click the audio to select it and open it in the Source Monitor. Play the audio clip and each time you feel a beat, lyric, or chorus, tap the astric (*) key. Initially we had markers many markers, but for this tutorial we narrowed it down to twelve.You can jump from marker to marker on your clip by first highlighting the clip and holding down the Command key (Mac) or the Control key (PC) and using the Left or Right arrow key to toggle from marker to marker.
You can also use the Astrick key in the program itself to lay markers in the Timeline. Make sure that nothing is selected and hit the Astrick key. A gray marker appears in the Timeline. Holding down the Command or control key and using the Left or Right arrow key will toggle your from marker to marker. To delete markers select Clip from menu and either Clear Marker or Clear All Markers. The short cut is found in the drop down window.
Now it is time to add the photos. We have twelve photographs for this project. Select your twelve best markers and delete the rest. To delete individual markers, select the marker, go to Clip>Clear Marker. To keep our project organized we have stored all of the Marilyn photographs in a Photos bin. To create a bin for to Project>create>Bin, and select a name and click K. Double click the photos bin to open it.
Place the photographs on the Video 1 Track of the Timeline. Adjust the length of each photo to line up with the markers. For a more precise alignment of the photos change the time scale to 1 second, or even ½ second.
There you have it. The most important element to making synching video to audio is to know the audio in and out before you begin to edit. Always edit to the music and synching video to it will be a snap. You have also become familiar with how to choose the appropriate Time Ruler Scale for an individual task. With more experience you will develop a sense of when to use a 1 Second scale, 4 Second scale, ½ Second scale, or even a Frame-Level scale.