
After Effects is a powerful masking tool. The reason After Effects is so powerful is there are literally dozens of ways to mask, stencil and pencil in After Effects.
In this article we are going to explore ways to use the Mask tool in After Effects to turn a still image into a movie.
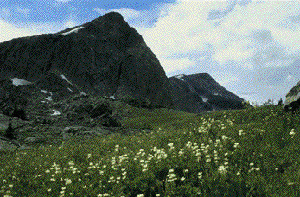
The image we had to create this project with was too dark. So to lighten it we took it into Photoshop and lightened it with the Brightness/Contrast tool. Because we were not worried about what the sky looked like we were able to brighten the image enough to bring more detail in to the image.
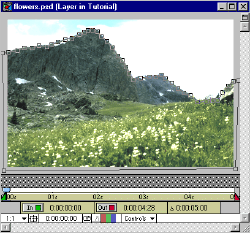
With the image the way we wanted it, we opened a new project in After Effects, inserted our image and cloud.mov that will replace the sky in our image. Drag the image that you want to replace the sky into the Time Layout Window. The image we used was called Flowers. Double click on the layer in the Comp Window to access the Layer Window. Now we are going to create a Bezier Mask. Select the Pen Tool and click your first point just outside the image where you want to start. Our image is of a mountain, so we clicked outside near where we wanted to start and then followed the mountain top. You will want to set as many Bezier points as possible so that you can adjust them later, after you put out the clouds in the Comp. Be careful not to click one Bezier point on top of another, as this will automatically close the shape and you will have to start over. When you get to the other side of the image, click outside the image, at the bottom of the image, across the bottom and up to your first point to close the shape.
Now it is time to go back and adjust your points. With your pointer make sure there are not any parts of the sky bleeding through, that all of the mountain is showing and that it looks natural. If you need to round some points, click on the Bezier Pen, click on the point and adjust the curve.
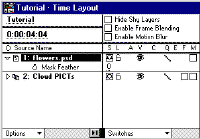
Now import your cloud movie into the Time Layout Window and place it below the mountain image. You will notice that it looks good but the edges are a little sharp. To fix this, select mountain image and press the “F” key. This brings up the Mask Feather. Click on the “O” to the right of the Mask Feather. This will bring up the Mask Feather Window. You will only want to adjust the Vertical pixels. Adjusting the Horizontal pixels will make the edges fuzzy. We found for this image a value of two gave it just enough of a feathered look to blend the two images.
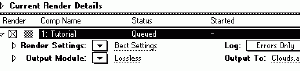
Now it is time to render the Comp. Click Composition>Make Movie and name your movie. In the Render Queue Window, make sure that Best Settings is selected in the Render Settings, Lossless in the Output Mode and click Render.
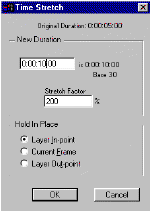
After we rendered our movie, we noticed that the clouds were rolling by too fast to look realistic. So we went back into the comp, selected Layer, then Time Stretch and stretched our Comp to ten seconds If this happens to you, just play with the Time Stretch until you are happy with the results.
As I said at the beginning of the article, there are dozens of ways to use masks in After Effects. Take the skills you have learned here and practice them on your own projects. Adapting parts or all of what you learned here.